Building Knowledge
How to repair gypsum board shaftwall damage
The PURPLE Book offers guidance on repairs to ensure fire-rating continuity
On a bustling commercial site, gypsum board shaftwall damage is an infrequent but high-stakes reality. Whether it’s a job box cart puncturing a shaftliner panel or a hole cut in the wrong location for a mechanical, electrical or plumbing rough-in, the integrity of that fire-rated assembly is compromised the moment the gypsum is breached.
For commercial contractors, repairing a shaftwall isn’t just about aesthetics. It is a critical life-safety issue because shaftwalls are tested, fire-rated assemblies. Repairing a gypsum board shaftwall with methods that haven’t been tested, such as filling a gap with fire caulk or using duct tape, risks nullifying the fire rating.
This article, based on recommendations from The PURPLE Book®, National Gypsum’s guide for fire-rated assemblies in commercial construction design and application, outlines best practices for assessing and repairing shaftwall damage to maintain fire continuity and code compliance.
Assessing the severity: the 10" hole rule
Measure the gypsum board damage before starting the repair because the size of the breach dictates the method of repair.
- Minor damage (maximum 10" × 10"): Generally, holes or damage up to 100 square inches can be patched, in 100 continuous feet of wall
- Major damage (over 10" × 10"): If the damaged area exceeds 10" by 10", the entire panel section should be replaced to maintain the fire rating, in accordance with the UL design
Shaft enclosures can be repaired from the face side or the shaft side
Because shaft enclosures are constructed of shaftliner that is friction fit into shaftwall studs on the shaft side and gypsum board fastened to structural members on the face side, the repair methods differ, depending on the side from which you make the repair.
Repairing a small hole from the face side
The face side is typically easier to access because there’s a floor to stand on.
- Remove the face side gypsum board.
- Trim the hole in the shaftliner panel so it has uniform edges.
- Insert a shaftliner patch — cut to match the dimensions of the hole — so it sits flush in the hole.
- Add steel track or strapping on all sides of the opening.
- Laminate a 1" shaftliner panel to the existing shaftliner panel, patch with setting compound and screw it to the stud and steel track with 5/8" Type S screws. This board should overlap the top and bottom of the patch by 12", unless it terminates at a J-track.
- Replace the face side base layer with Gold Bond® XP® 5/8" Fire-Shield® Gypsum Board fastened to the studs and track with 1" Type S screws 24" on center.
- Replace the face layer with 5/8" Fire-Shield gypsum board fastened to the studs and track with 5/8" Type S screws 12" on center. Joints should be staggered 24" horizontally and 12" vertically from the base layer joints.
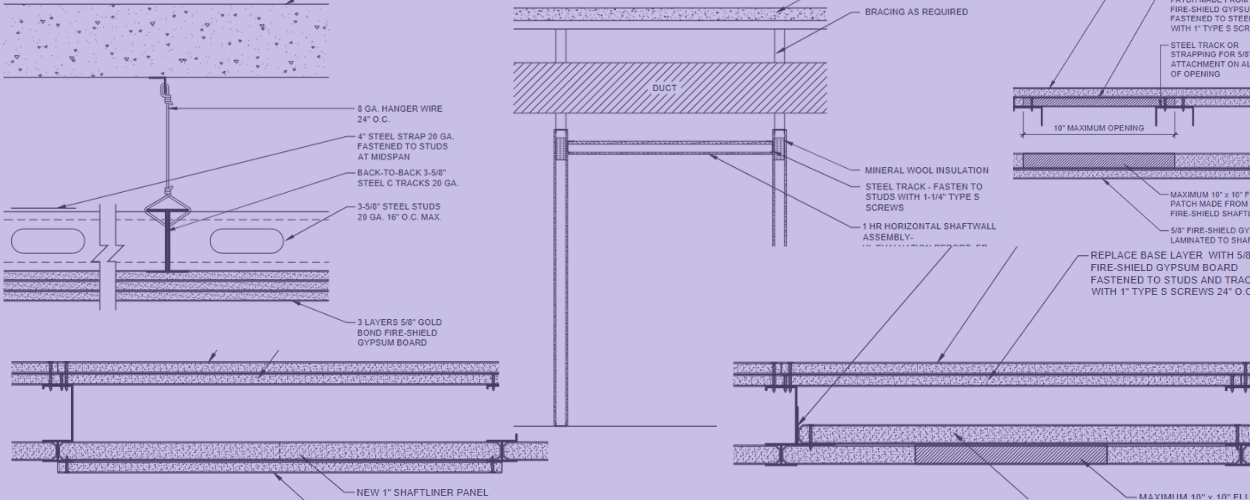
 The PURPLE Book, page 94
Repairing a hole larger than 10" × 10" can also be done from the face side.
- Replace the damaged shaftliner panel by fitting a 1" shaftliner panel cut in half lengthwise into the H-stud.
- Install a 1" × 1" steel angle to the stud with 3/8" pan head screws 24" on center.
- Laminate a new 1" shaftliner panel to the replacement shaftliner panel with setting compound and secure it to the steel angle with 5/8" Type S screws 12" on center.
- Follow steps 6 and 7 in the list above for the face side of the shaftwall.
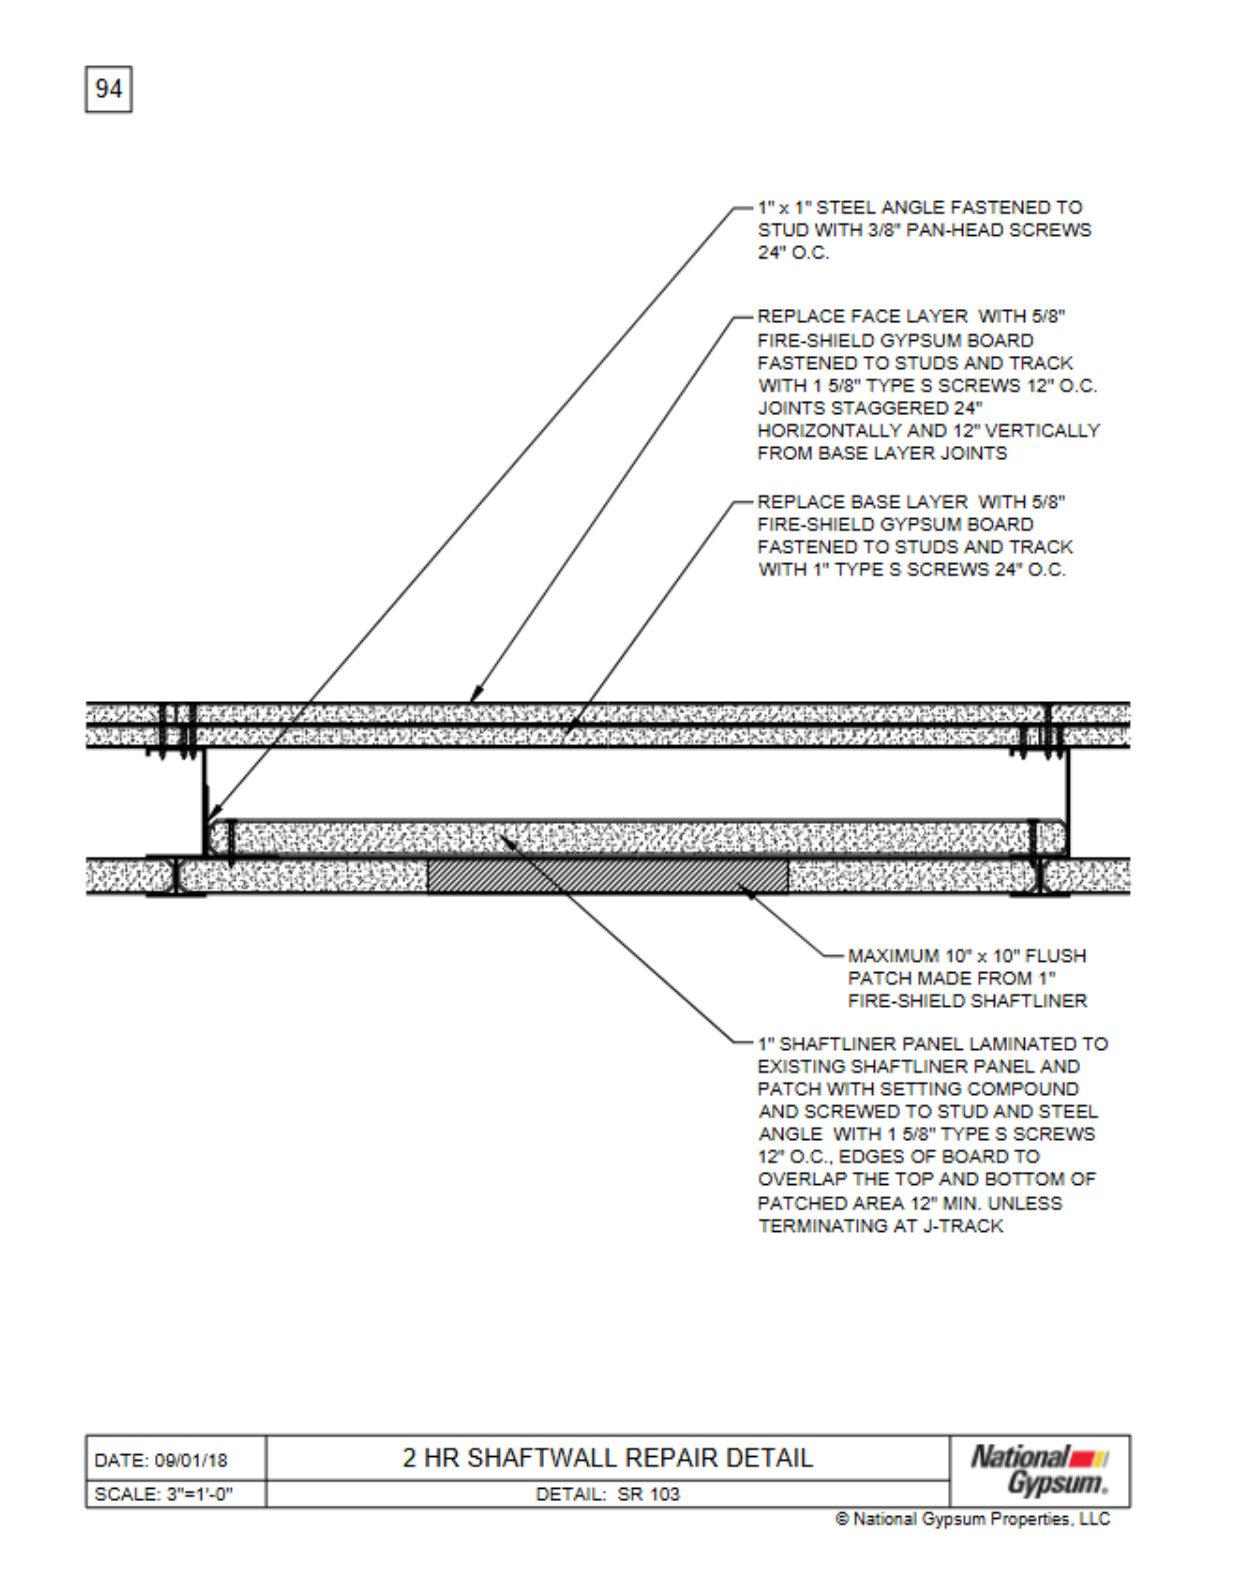
 The PURPLE Book, page 95
How to make shaft side repairs
Repairing the shaftliner and gypsum board from the shaft side is more challenging because it requires scaffolding to be assembled inside the shaft. The repair process for small and large holes follows the same process as repairs done from the face side, except the additional gypsum board laminated to the patched or replaced shaftliner panel is added to the shaft side. In both cases, this additional layer is 5/8" Fire-Shield gypsum board.
The diagram below shows repair steps for a small hole completed from the shaft side of the enclosure.
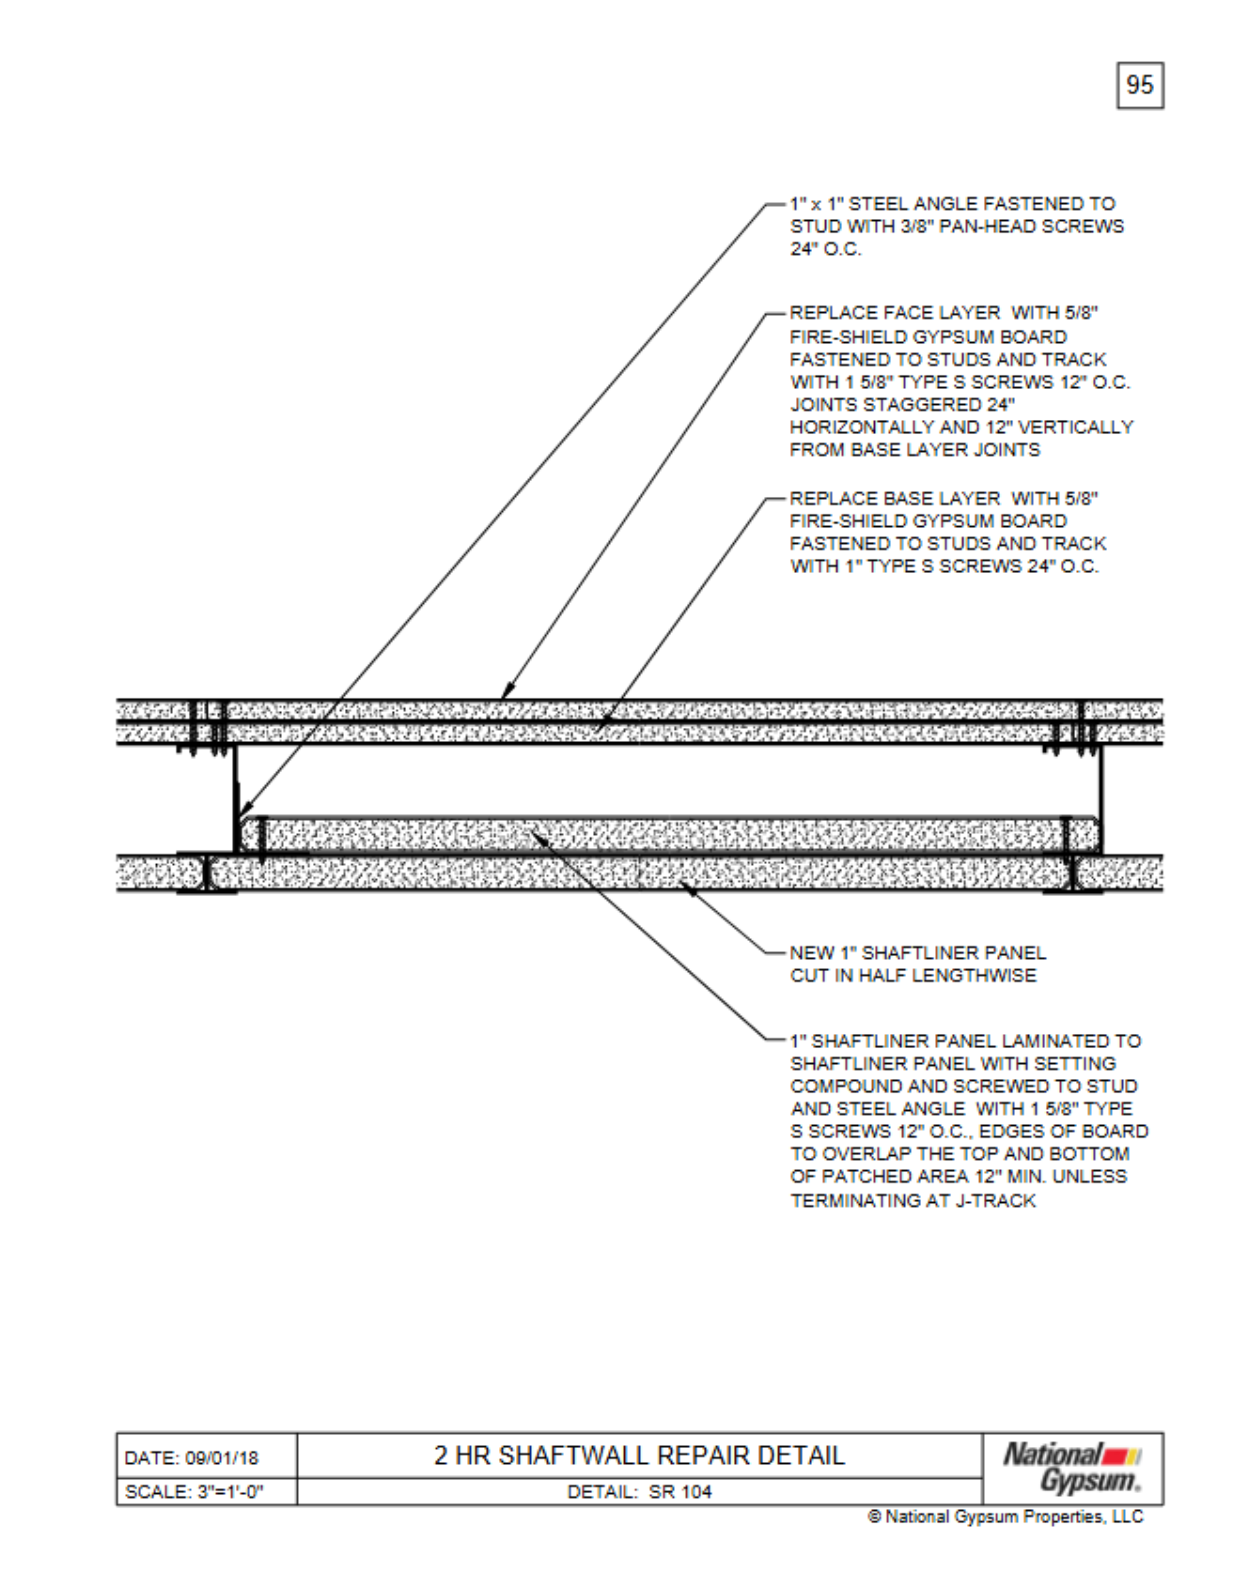
 The PURPLE Book, page 92
The following diagram shows the repair steps for a large hole completed from the shaft side of the enclosure.
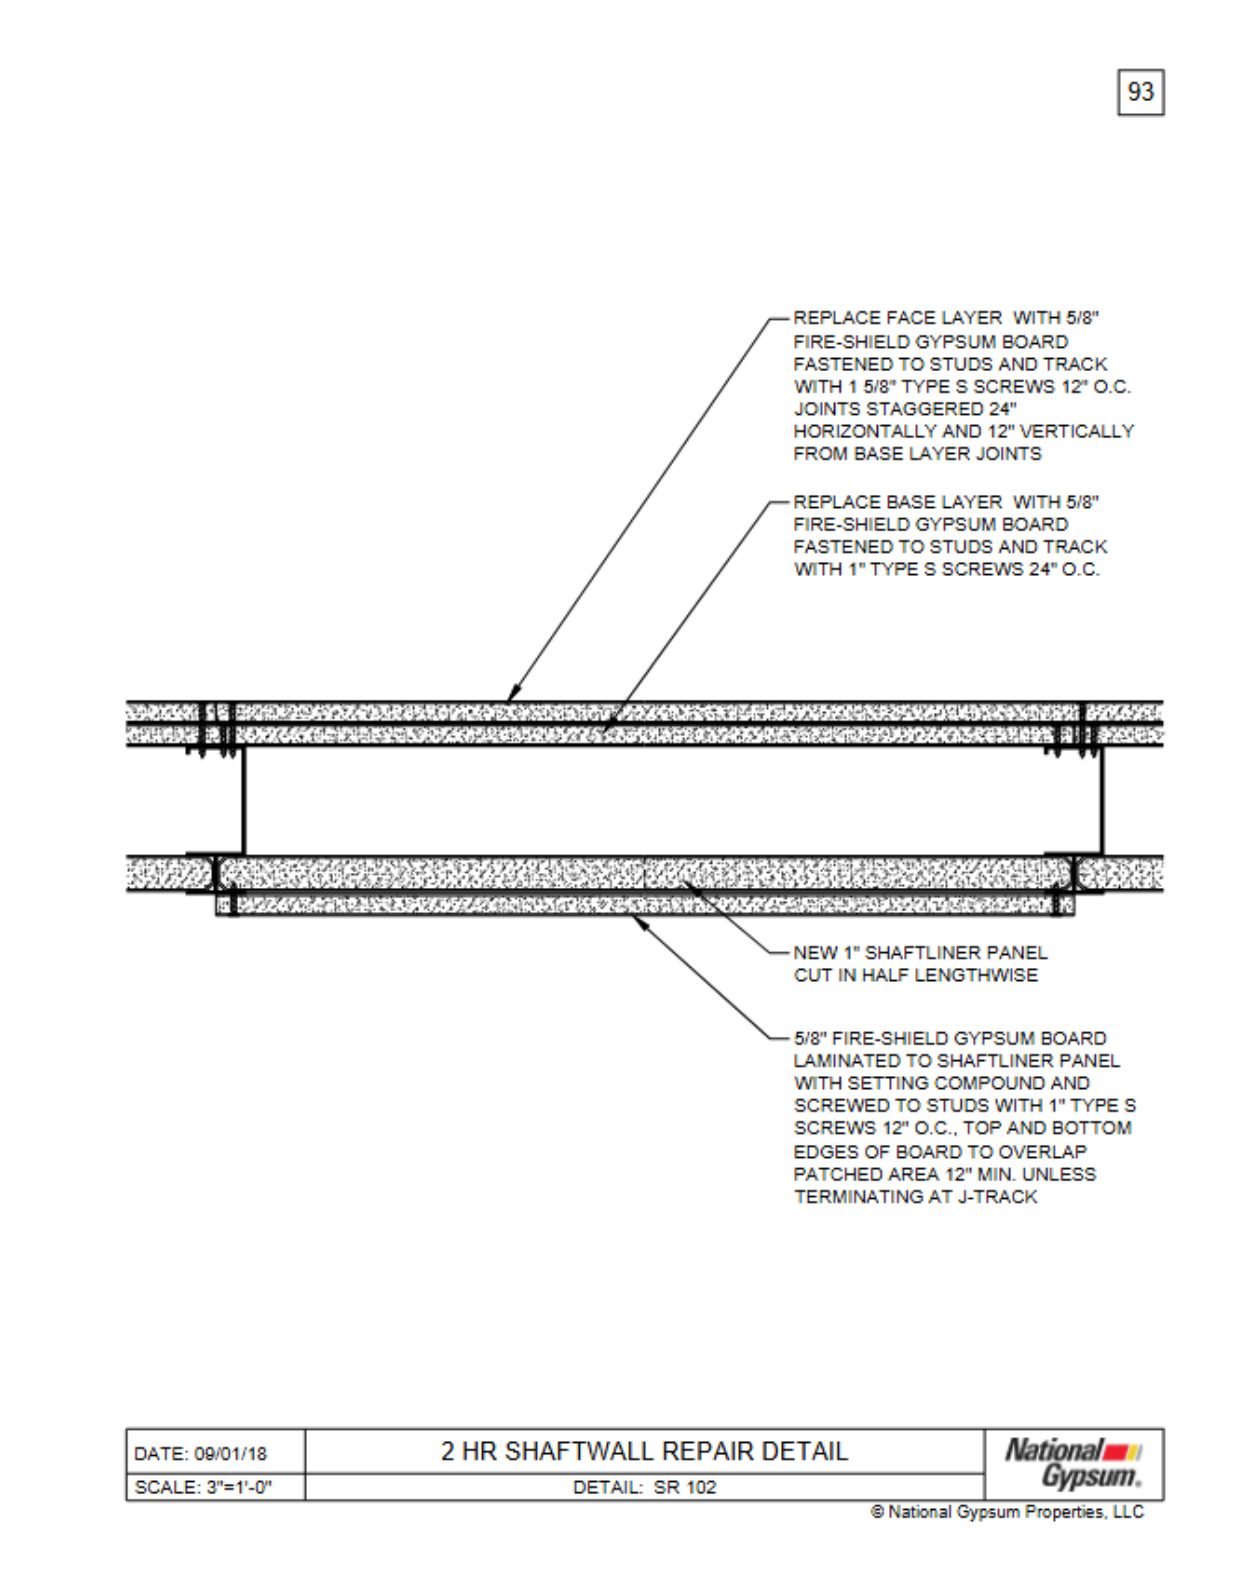 The PURPLE Book, page 93
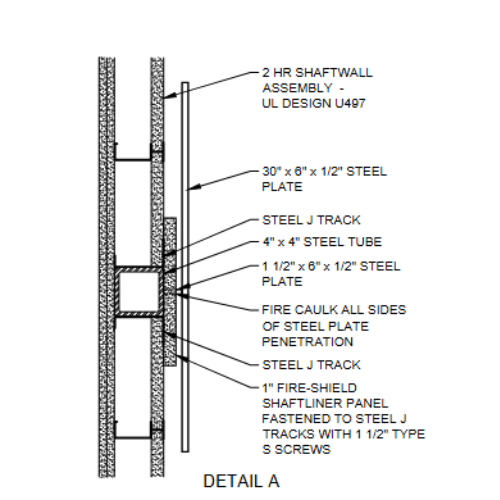
The steel tube challenge: elevator hoistway guides
A common challenge in building shaftwall enclosures is dealing with structural interruptions, specifically steel tubes used for elevator hoistway guides. These steel tubes often break the continuity of the shaftwall, creating a weak point in the fire rating.
Simply abutting the drywall to the steel tube and caulking it is not the answer. Steel conducts heat, which can bypass the gypsum board’s thermal protection.
To maintain the fire rating where a steel tube interrupts the wall, create a continuous barrier.
- Laminate: A 1" shaftliner panel should be laminated over the interruption, securing with Type G screws.
- Encapsulate: The shaftliner panel is typically attached to J-tracks that run the entire length of the shaft.
- Continuity: Even though the steel tube breaks the primary wall line, the gypsum barrier remains continuous behind or around it, preserving the UL design.
Ask questions first, repair second
The 1-800-NATIONAL® Construction Services team has seen its share of shaft enclosure repair challenges over the years, including some that rely a bit too heavily on caulk — or even duct tape. Krista Karlson, manager of National Gypsum Construction Services, encourages contractors to call ahead for advice or to walk through their repair plans with a team member.
“Ask questions before you make the repair,” Karlson said. “We get photos of completed repairs and we can’t see what’s been done. Call and tell us what you have, so we can work through it together. Generally, there is a way to repair it.”
Always keep documentation and photos of your repairs before closing up the wall. Proof of the 12" overlap and proper fastener spacing is your best defense against a failed inspection.
Be the first to hear of new NGConnects Blog posts by subscribing here for early access.